ADOBE ILLUSTRATOR: Classroom in a book
For the beginning part of the year I will be using the Adobe Illustrator book to complete Lessons 1-7 in the book. This will give me a better knowledge of the program, which will help me further on in the year.
LESSON 1: A Quick Tour of Adobe Illustrator.
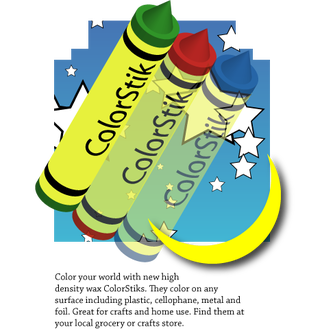
Using the Adobe Illustrator CS book I created this ad for "Color Stik" crayons by going through the simple tour of the book. For this lesson a variety of tools were used.
LESSON 2 OF ADOBE:Selection Basics

Using the Adobe Illustrator i made a logo for french fries and a dog face in one of the lesson tours. In the lesson we experimented with 3-D shapes, borders, shapes, the selection and direct selection tool. In lesson two there was a exploring on yuor own section. The stars I made were from diffrent tools of cloning


LESSON 3 :Creating Basic Shapes
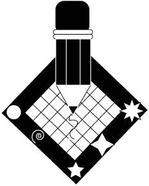
In the lesson I learned how to make different shapes liek an eclipse, rectangle, and star. The lesson also taught different ways to create shapes with tools and arrows. In the lesson i made an created a logo with a pencil , made from rectangles; a grid also made with the rectangle tool and grid tool; and a decoraive background from the shapes tool.
LESSON 4: Drawing with the Pen tool

With the Adobe Illustrator book i learned how to use the pen tool and swatch tool to make a pear. The lesson showed different way to use the pen tool and its variations. Then in the end part of the lesson you begin to compose the pear. First I had to make the pear outline, by making arc segments and using anchor points. The I created the arrow that would go through the pear with the Illustrator windows tab. Which contains option for different symbols. Then I went back and filled in the pear with the swatch tab , I repeated this step for the leaf and stem. Then i placed the arrow in the appropriate spots and my pear was complete.
LESSON 5: Painting

Lesson 5 in the book was about using swatches and different appearance effects you can apply to a piece of work. You can also creat your own swatches and olors and save them. The lesson taught how to change the color greyscale and gradients. Using different brushes I could change the outines of the hat or add decorations like the leaves on one hat. Lesson 5 was a fairly simple lesson, but taught a valuable lesson about painting in Illustrator.
LESSON 6: Applying Transparency and Blending Modes

In this lesson the art of transperancy and blending was taught. This was not my finished piece but this is what the finished product should somehwat look like. Transparency allows you to add mulitple affects in work but also make on more solid than the other. It help creat a look like the crayons in lesson 1. You can even make colors look less vibrant by changing the transperancy for a more muted look.
Lesson 7: Working with Layers.
In this lesson I experimented with the use of layers. Layers can make developing work much simpler, because it allows you to separate the work and add features to it individually. Layers are in every piece of work, atleast one layer is. In this lesson you are taught how to create more layers, merge layers, effect the appearance, and add sublayers.
HOLY NAME ANNUAL HARVEST FESTIVAL
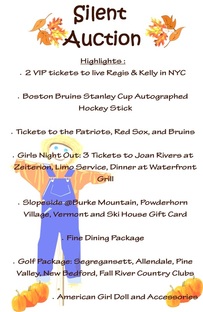

Recently a teacher asked my graphics class to design posters for her daughter's school's Annual Harvest Festival . The posters had to advertise the school's Penny Social and Silent Auction. On the posters i showcased ticket books fot the Penny Social and prizes like tickets to Regis and Kelly and the Bruins for the Silent Auction. Using my knowledge Publisher, Photoshop, and Illustrator i created the previos two flyers for the event, which were chosen to be used for the festival.
TRIANGLE FISH

Using Adobe Illustrator I made a trianlge fish by combining different shapes of fish and swatch colors. This fish was the first piece of work I completed without using the Adobe book. It was simple but still used tools and techniques the book taught. Some tools I used were the polygon tool and transform. A design like this fish could be used in Advertising for somethign similiar to a sushi place of seafood market.
Adobe Illustrator CS Idea Kit

Using a smaller Adobe Illustrator book i created a clipping mask of my name and a shape. Though there was some technical difficulties i was able to create a mask. Using the book i also experimented with the crystalize tool, pucker, bloat, and scallop tool. And I also add drop shadows to the petals and other parts of the flyer. To make a furry effect i sued the crystalized tool and edited a pictuer of a zebra to have stripes that looked like a fur and an outline that looks less drawn and more 2-D.


Business Cards using Adobe Illustrator CS Idea Kit

Using Adobe idea kit i made two business cards in under 10 minutes. To create the items you open a blank template saved in the program. Some of the tools I used to create the cars were scatter brushes' elements, Web icons, my own photos, and clipping masks. The two cards i did were for "Artful living" and "Family Adoption Services". The tools added a dynamic and creative effect to the card. Using 3-d shapes and knowing how to place the space of the card made a fun intersting look and would be great for any business.

Adobe Idea Kit : Brochure
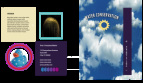
Using the Adobe Idea kit i created this brochure as practice. I later might use the same steps to create brochure for my Thayer Str. field trip. I used in this brochure : the DvD Booklet outside template, Neon tools, the Windows libraires, my own phots, clipping mask tool, and the blending tool. Using original elements of the document I made my own brochure for "Water Conservation"
